
Hydro Dip Home Décor: Beginner’s Guide
You can turn ordinary items into amazing art pieces with Hydro Dip Home Décor – a technique that creates psychedelic effects so unique that no two pieces will ever look alike. Want to add swirled designs to your mason jars, ornaments, or coasters? We’ve found this amazing technique that creates stunning results with surprising ease. The process of hydro dipping transfers paint from water’s surface onto an object by dipping it. This budget-friendly DIY method lets you apply intricate designs to three-dimensional items right in your home.
The technique works great for creating vibrant coasters or tackling weekend projects, and we’ll show you every step. Your chosen pattern will completely cover objects with vivid colors – that’s what makes this method special. We’ll explain how to use acrylic paint and which surfaces give the best results. Ceramics work great, and wood can too with proper prep to stop it from warping.
Choose and Hydro Dip Home Décor Item
Success in Hydro Dip Home Décor begins with picking the right item and getting the prep work right. A stunning finished piece depends on these basic first steps that many DIY fans tend to skip. Let me show you how to choose and prepare your canvas for this creative technique.
Pick the right surface: ceramic, wood, or glass
The best items for Hydro Dip Home Décor can handle being submerged in water. You can use pretty much any non-porous surface:
- Ceramics (vases, planters, mugs)
- Glass (decorative bowls, vases)
- Wood (picture frames, decorative boxes)
- Metal and plastic items
Wood needs extra care since it soaks up water. I make sure wooden items get proper sealing to avoid warping during the process. Ceramic and glass pieces give excellent results because of their smooth, non-porous surfaces.
Clean and sand the item for better paint adhesion
Your prep work makes or breaks the Hydro Dip Home Décor process. I start by cleaning the item to get rid of dirt, oils, grease, or loose paint that could mess up the final look. My go-to process for most surfaces includes:
- A grease and wax remover to clean
- Light sanding with fine-grit sandpaper (800-1000 mesh works well) to create an even base
- A final wipe with a tack cloth to remove dust
This prep creates the perfect surface for paint to stick, which makes your Hydro Dip Home Décor design last longer.
Apply a base coat if needed
Your base coat does more than add color. It helps bond your item to the decorative film and smooths out tiny flaws. The base color you pick also changes how your final piece looks.
Most projects need a primer first, plus 2-3 light coats of paint. Each layer needs to dry fully. White base coats make colors pop with true-to-life vibrancy, while tan or beige creates an earthy look. Note that each material needs its own prep approach – ABS plastic might not need a base coat, but wood, metal, ceramics, and other plastics usually do.
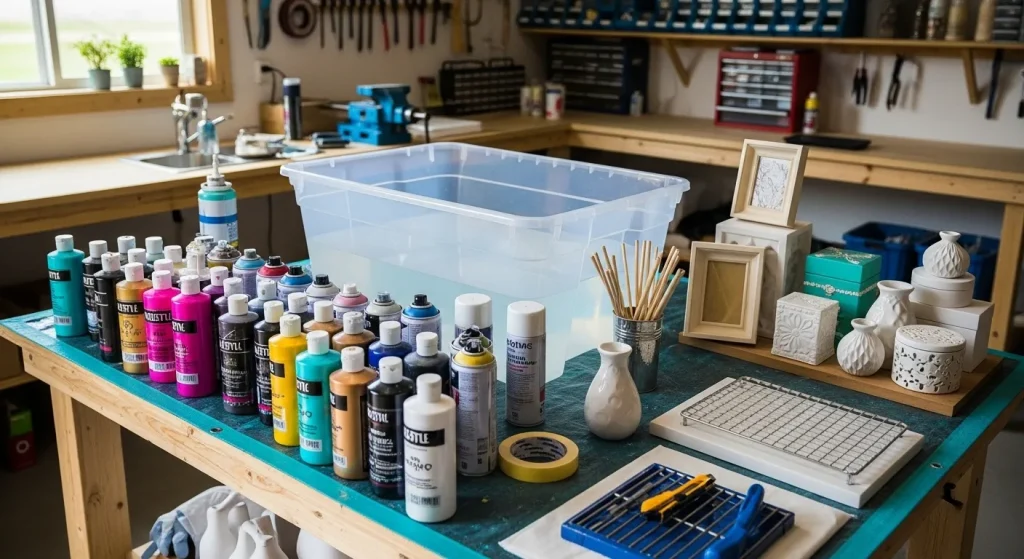
Set Up Your DIY Hydro Dip Home Décor Station
Let’s create a dedicated workspace for the Hydro Dip Home Décor magic after prepping our item. The right setup will give a safe and successful outcome for your home decor projects.
Select a large container for water
The right container plays a vital role in the dipping process. You’ll need a watertight container made of plastic, glass, or aluminum that’s deep enough to fully submerge your decorative piece. Make sure to leave 5-6 inches (approximately 12-15 cm) between the edges and your item.
A large storage tub from a hardware store serves beginners perfectly. More advanced options include:
- A laundry wash tank
- A cattle trough (about 4 feet long and 1 foot deep)
- A Christmas tree storage tub
Your container should fit your item’s size comfortably without feeling cramped.
Work in a well-ventilated area
The chemicals in Hydro Dip Home Décor release fumes, so proper ventilation is non-negotiable. My workspace sits near windows with good airflow. On top of that, it needs a clean area that helps create quality finishes.
Better ventilation comes from:
- An exhaust fan for indoor work
- An open-face spray area
- A station away from living spaces
Gather gloves, spray paints, and protective sheets
You can’t skip safety equipment when Hydro Dip Home Décor. These chemicals can harm your skin and their fumes are dangerous to breathe. Your safety kit should include:
- Latex or nitrile gloves (not all gloves protect adequately)
- High-quality respirator with appropriate filters
- Safety glasses or face shield
- Thermometer to measure water temperature
- Spray paints in your chosen colors
- Protective sheets or drop cloths for your work area
The size of your project determines how much protection you need, but even small DIY Hydro Dip Home Décor projects need simple safety gear. Now that everything’s ready, you can start creating your beautiful Hydro Dip Home Décor.
Create and Apply the Paint Design
Magic happens when paint meets water in Hydro Dip Home Décor, creating a unique canvas that lets your creativity shine. A few basic techniques will help you turn simple materials into tailored art pieces.
Shake and spray paint onto water surface
The paint needs proper preparation before you start dipping. You should shake each spray paint can for 1-2 minutes until you hear the mixing ball move freely. This will give a proper paint consistency and keep the spray head from clogging.
To apply the paint:
- Spray one shot of paint directly into the center of your water container
- Follow with about 3 shots of each color
- Keep the spray can about 8 inches from the water’s surface
Cool water works better than warm water. Heat makes the paint set too quickly on the surface and can leave unwanted globs on your decor piece.
Experiment with color combinations
Hydro Dip Home Décor offers endless color possibilities. Using 3-4 colors per dip creates distinctive patterns. Beginners should start with colors that match their home decor theme or existing accent pieces.
The colors migrate outward as you spray them onto the water, floating on the surface. This natural movement creates organic patterns. Spraying colors next to each other rather than directly on top gives cleaner definition.
Use a stick to swirl for marbled effects
You can dip right away after spraying your colors or create more intricate designs first. A skewer, toothpick, or silicone stick helps create beautiful marbled effects with gentle swirls on the water’s surface.
Try these techniques to get different results:
- Light swirls to create subtle patterns
- More aggressive swirling for dramatic effects
- Minimal manipulation to keep larger blocks of color
Note that you need to work quickly once the paint hits the water since it starts to set within minutes.
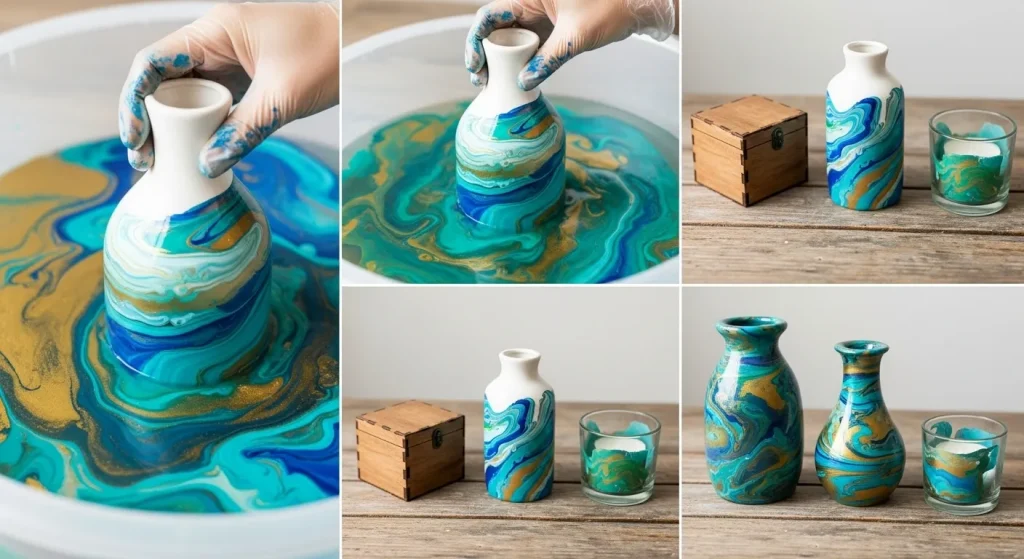
Dip, Dry, and Seal Your Decor
Your paint design floating on the water surface marks the big moment. A perfect dip will bring your vision to life, but this vital phase needs patience and proper technique for lasting results.
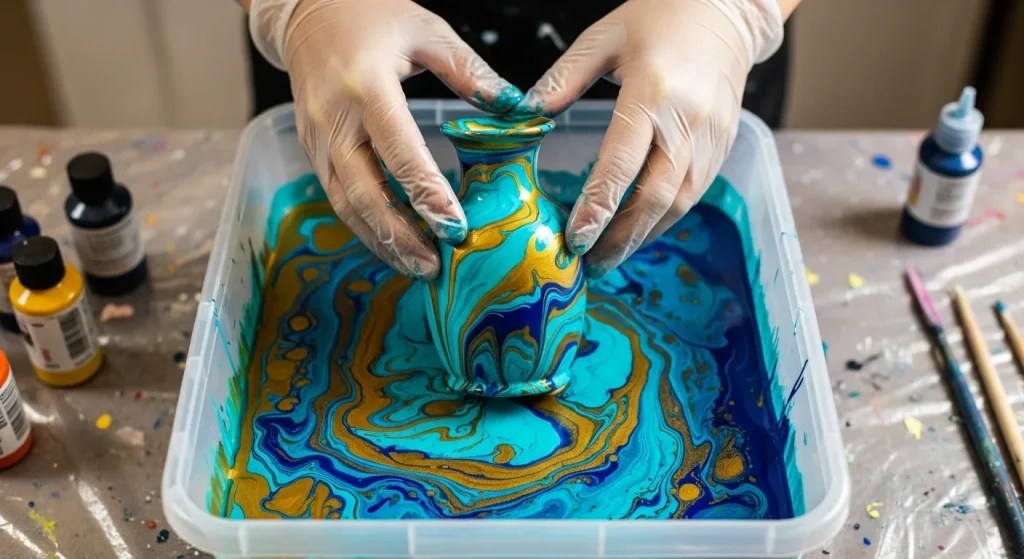
Dip the item slowly and at an angle
Hold your home decor item at a 30-45 degree angle before you submerge it into the painted water. This technique helps prevent air bubbles from forming underneath the design. Your motion should be steady and continuous without stopping, any jerky movements will leave visible lines in your pattern. The paint film wraps smoothly around all contours as you lower the item.
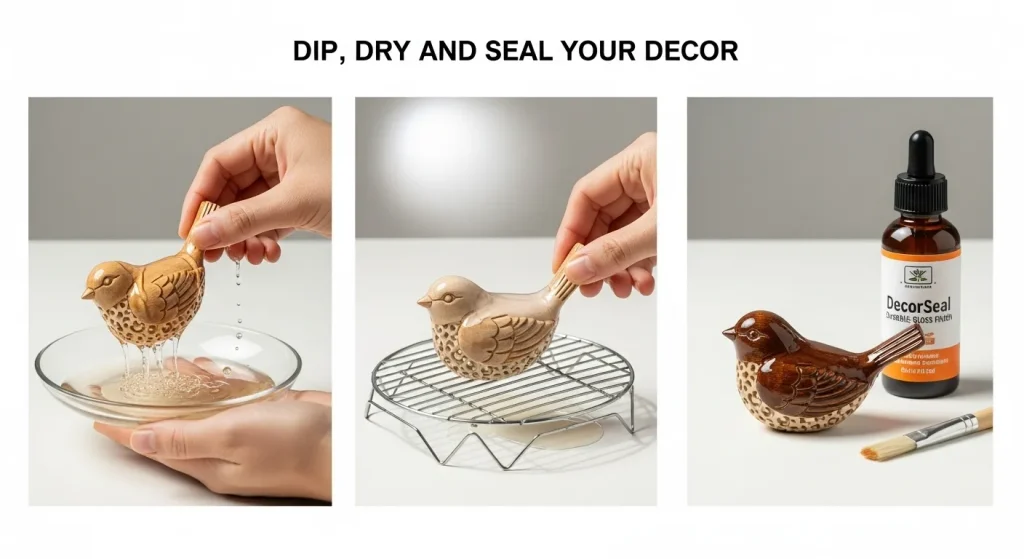
Let the item dry completely
Rinse your item gently with clean water after dipping until it doesn’t feel slippery. Your creation needs optimal drying conditions, place it on a rack or use compressed air instead of towel-drying that can smear the design. Drying times vary with humidity levels and usually take several hours. Make sure no water droplets remain before you move forward.
Apply a clear sealer for durability
Your masterpiece needs protection once it’s dry. You can use:
- Clear spray sealant (available in matte, semi-gloss, or gloss finish)
- Automotive-grade clear coat for maximum durability
- Food-safe epoxy for items that will contact food
Light coats work best, apply 2-3 layers and let each one dry. This sealing step preserves your design and boosts color vibrancy.
Tips for avoiding paint on unwanted areas
Painter’s tape creates clean lines on areas you want to protect. Petroleum jelly works great as a barrier on irregular surfaces, paint won’t stick to treated areas. This method works really well for handles or interior sections of vases and bowls.
Conclusion
Hydro Dip Home Décor offers a fun, creative way to personalize home décor with stunning, one-of-a-kind designs. With a few simple steps, you can transform ordinary items into unique art pieces. Preparation is key, clean surfaces, proper sanding, and a solid base coat ensure lasting results. you can read Hydro Dipping Metal vs Plastic also.
Safety matters too, so work in a ventilated space and use protective gear. Once you start experimenting, you’ll discover endless design possibilities, from bold patterns to elegant swirls that reflect your style. With patience and practice, anyone can master this technique and create custom décor that turns everyday items into true conversation pieces.