Customizing Your Car Parts with Hydro Dipping: Is It Worth It?
Hydro dipping (hydrographics) applies PVA film patterns to automotive surfaces, creating durable, complex finishes. This article covers its process, suitable Car Parts, and comparison to alternatives like powder coating and Car Parts wrapping. It delivers striking textures and graphics efficiently. You’ll learn the step-by-step process, prep guidance, lifespan, costs, and safe DIY methods, along with maintenance and troubleshooting. Understand the process to assess if hydro dipping is right for your vehicle.
Hydro Dipping Explained
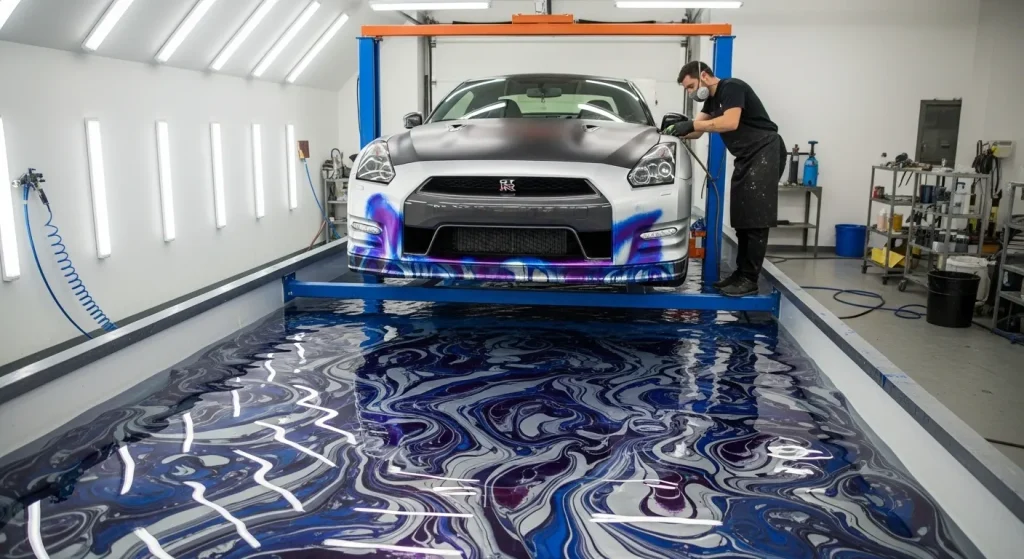
Hydro dipping is a surface-finishing method where a water-soluble film is floated, activated, and transferred to a prepared part. The PVA film dissolves into an ink layer, bonding to the base coat to create continuous patterns on complex surfaces. Sealed with an automotive clear coat, it resists UV and abrasion. Understanding this helps determine suitable Car Parts and necessary coatings for longevity.
Key Steps in Hydro Dipping
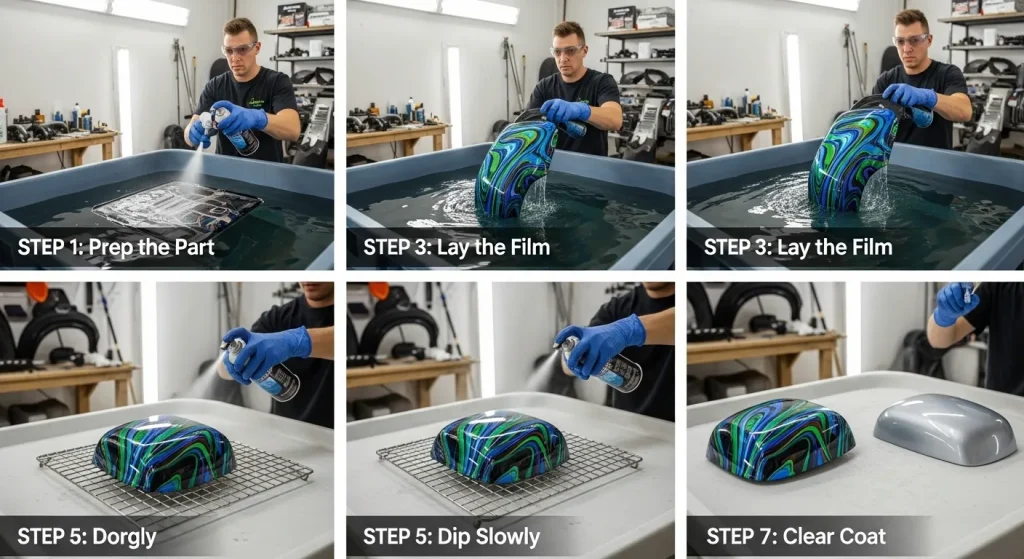
The hydro dipping process includes surface preparation, applying base coats, floating and activating the PVA film, dipping the part, rinsing, and applying a UV-resistant clear coat. Proper sequencing ensures adhesion and minimizes defects, with clear coating being critical for durability.
Hydro Dipping Essentials
DIY hydro dipping requires PVA films, base paints, activator, clear coats, and basic tools. Professional setups add specialized equipment. Safety gear (respirator, gloves, eye protection, ventilation) is mandatory. Choosing the right activator and clear coat is crucial for automotive applications.
Compatible Car Parts
Hydrographics suits many automotive Car Parts, particularly interior trim and decorative exterior accents, which need robust clear coats. High-wear items like wheels are possible but require specialized prep and sealing. Interior and decorative components generally yield the best results due to less abrasion and exposure.

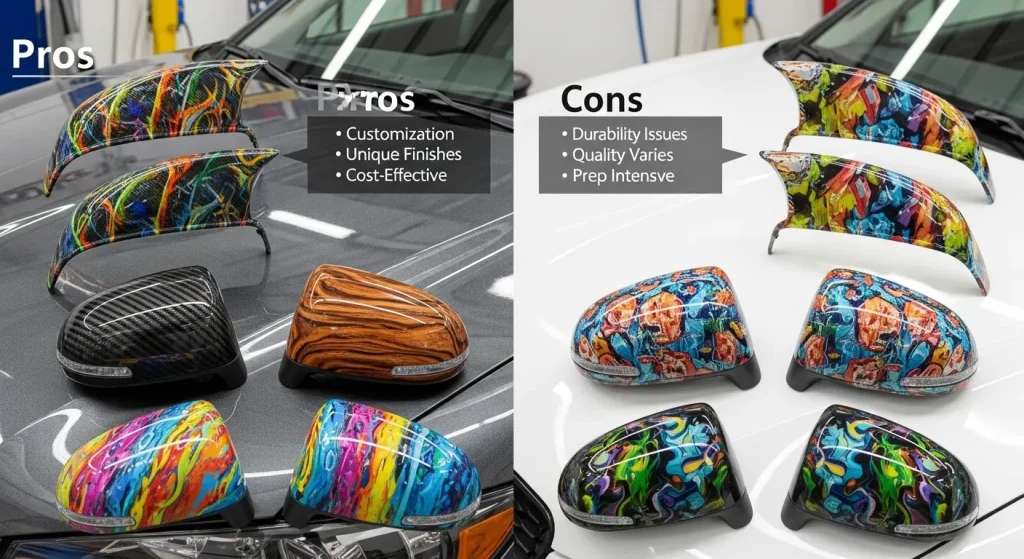
Pros & Cons of Hydro Dipping
Hydro dipping offers complex patterns, cost-effective customization, and versatility, but has limitations in wear resistance on exteriors and depends on prep and clear coat quality. Evaluating these helps determine if it suits your customization goals.
Benefits of Hydro Dipping
Hydro dipping provides high aesthetic complexity with patterns like carbon fiber or wood grain, without complex masking. It works on various materials (plastics, metals, composites) and allows efficient repeatability. It unlocks design possibilities impractical with conventional painting, especially for contoured Car Parts.
Hydro Dipping Challenges
Challenges include adhesion failures from poor prep, exterior wear concerns, and a learning curve leading to rework. Environmental control and handling are critical. The finish doesn’t add hardness like powder coating. Adhesion sensitivity, mechanical wear vulnerability, and the learning curve are key limitations.
Comparing Customization Methods
Hydro dipping offers finer detail than wraps and more complexity than basic spray jobs. Powder coating provides superior hardness, while hydro dipping relies on its clear coat. Vinyl wrapping is reversible; hydro dipping is semi-permanent. Choose hydrographics for complex 3D patterns where extreme abrasion resistance isn’t the top priority.
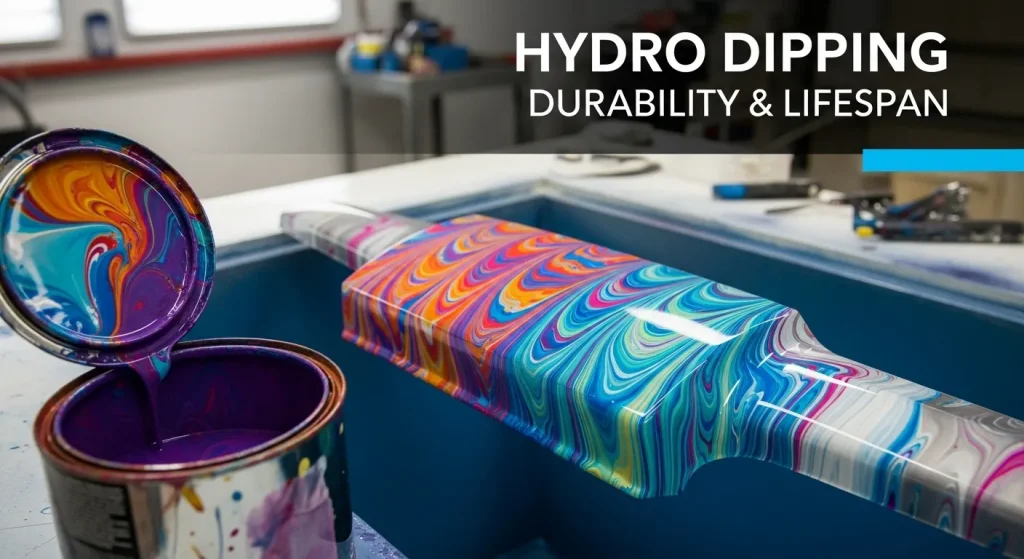
Hydro Dipping Durability & Lifespan
Hydro dipped finishes last based on prep, clear coat, and environment. Lifespan varies by part and exposure, from years inside to fewer on wheels. Longevity depends on adhesion, UV resistance, and topcoat protection.
Expected Lifespan
Lifespan varies: interior trim 8–15 years, exterior trim 4–8 years, and wheels/high-wear exteriors 2–5 years. Interior Car Parts last longest with less UV/abrasion; exterior components degrade faster from exposure.
Key to Longevity: Prep & Clear Coat
Proper preparation (sanding, adhesion promoters, clean surface) is essential for bonding. The clear coat, with UV inhibitors and appropriate hardness, prevents yellowing and cracking. Skipping these steps is the main cause of premature failure.
Maintaining Hydro Dipped Parts
Gentle maintenance with mild cleaners and microfiber cloths extends lifespan. Avoid high-pressure Car Parts washes. Minor scratches can be spot repaired. Timely repairs and careful cleaning minimize abrasion and chemical attack.
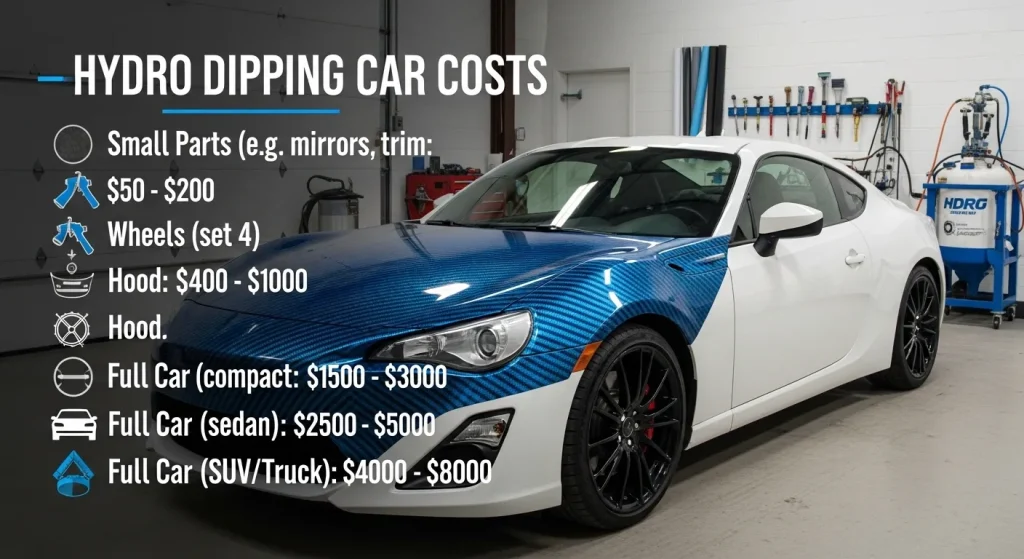
Cost of Hydro Dipping
Costs vary by part size, prep, pattern complexity, and choice between professional services or DIY kits. Evaluating options helps balance budget and quality.
Professional Service Costs
Professional services range from $50–$150 for small items, $100–$400 for medium, and $300–$1,200 for large items, including prep, base coat, dip, and clear coats. Costs vary by region and shop.
DIY Hydro Dipping Kits
DIY kits offer lower initial cost but require additional purchases like sandpaper, primer, and safety gear. They suit small decorative pieces or learning, providing film, activator, and basic instructions, but often need more tools.
Factors Affecting Cost
Cost factors include part complexity, prep time, film rarity, and clear coat quality/warranty. Prioritize prep and clear coat for durability over exotic films. Understanding these drivers helps optimize spending.
DIY Hydro Dipping: A Safe Guide
Many successfully hydro dip at home with proper safety, prep, and practice. Pro-level results require attention to environment, materials, and technique. This section covers DIY steps, safety, and troubleshooting.
Step-by-Step DIY Guide
DIY hydro dipping involves preparing a ventilated workspace, thorough part prep (cleaning, sanding, priming), applying base coats, floating/activating film, dipping, rinsing, drying, and applying clear layers. This workflow emphasizes prep, environmental control, and measured steps for consistent results.
Home Hydro Dipping Safety
Chemical exposure and solvent fumes are primary hazards. Use a respirator, eye protection, and ventilation. Store and dispose of activators/clears properly. Safety gear is non-negotiable for health.
Common DIY Challenges
Common challenges include adhesion failure (check prep), pattern distortion (control activator), and surface contamination (use tack cloths). Troubleshooting and preventive checks reduce failures and improve learning.
Professional Hydro Dipping Services
Finding a specialist involves evaluating portfolios, materials, and service scope. Professionals offer packages including prep, painting, dip, and clear coats. Films, activators, kits, and training are also available for DIYers and shops.
Choosing a Specialist
Evaluate specialists by checking portfolios, materials, clear coat brands, and prep work. A good specialist details prep, clear coat systems, and environmental controls. Ask for examples and clear coat specifications.
Pro Services & Options
Professional shops offer tiered packages, from basic dips to premium services with extensive prep, color-matching, multi-stage clears, and custom films. Wheel services may include rebalancing and impact-resistant clear coats. Premium options can add ceramic topcoats.
Evaluating Pro Pricing & Turnaround
Request itemized quotes detailing services, turnaround, and warranty. Compare inclusions, not just price. Consider shops offering training. Complexity and seasonality affect scheduling; confirm prep, paint, dip, clear coat layers, rush fees, and custom film lead times.
Conclusion
Hydro dipping Car Parts is a versatile automotive customization solution, offering intricate, high-design finishes. Its success depends on meticulous prep, clear coat quality, and maintenance. Whether DIY or professional, understanding the process, challenges, and safety is crucial. Weighing pros and cons and prioritizing proper execution makes hydro dipping a worthwhile investment for striking Car Parts. you can read our Hydro dipping guide about Trending Hydro Dipping Patterns 2025 also.