
5 Quick Hydro Dipping Techniques to Create Amazing Patterns
Hydro dipping creates stunning, one-of-a-kind designs by transferring paint from the water’s surface onto objects. Also known as water marbling or immersion printing, it’s a simple way to make ordinary items look extraordinary.
I’ve used it to transform mason jars, ornaments, dishes, and coasters with beautiful swirl patterns, and it only takes a few basic supplies! While this DIY method is easy to do at home, professionals also use it for car parts, helmets, motorcycles, and even guitars.
If you love tie-dye, marbling, or acrylic pouring, you’ll enjoy these quick and creative hydro dipping techniques. Let’s explore five easy methods you can try today.
Classic Spray Paint Swirl
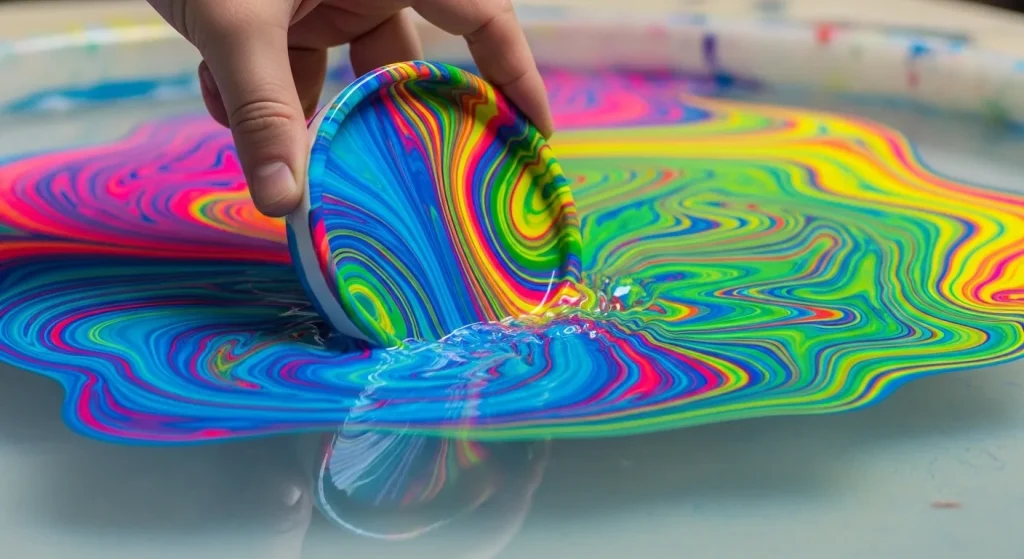
People know the spray paint floating on water as the most popular hydro dipping technique. This Classic Spray Paint Swirl method creates psychedelic patterns that change ordinary objects into eye-catching conversation pieces. The beauty of this technique lies in its simplicity – no two dips will ever look the same, which makes each creation unique.
Classic Spray Paint Swirl overview
The Classic Spray Paint Swirl technique works because oil-based paint floats naturally on water instead of dissolving. The pattern transfers to the item when an object moves through this floating paint layer. It wraps around curves and sticks to textures. You can use this technique on almost anything – plastic, metal, fabric, wood, glass, ceramic and more.
This method creates stunning results, but safety comes first. You need to work in a well-ventilated space or outdoors because of the chemicals released during spraying. Using a respirator helps too. Despite these safety needs, this remains the easiest way to start hydro dipping.
Materials needed for Classic Spray Paint Swirl
You’ll need these basics to start with this fundamental hydro dipping technique:
Steps to create Classic Spray Paint Swirl
The best results come from adding several thin layers of clear polyurethane spray after drying. This protects your design from damage.
Marbled Nail Polish Dip

Nail polish is a budget-friendly way to create stunning marbled effects on objects. This available hydro dipping technique turns ordinary items into colorful works of art with materials you probably have at home.
Marbled Nail Polish Dip overview
Nail polish marbling works better than spray paint methods on smaller objects and creates delicate, wispy patterns that look like watercolors. The technique succeeds because nail polish floats on water without dissolving right away, which lets you play with patterns. This method works great, especially when you have ceramics, glassware, and small plastic items to decorate.
The best part about nail polish marbling is how versatile it can be. You can customize anything from mugs to vases, or even wine glasses that need a refresh. The designs stick really well to almost any non-porous surface after they dry.
Materials needed for Marbled Nail Polish Dip
Here’s what you’ll need to start hydro dipping:
Steps to create Marbled Nail Polish Dip
The sort of thing I love about this technique is how it creates elegant, unique pieces. Practice with cheap items first until you get comfortable with the process. These make great gifts or home decorations.
Two-Tone Split Dip
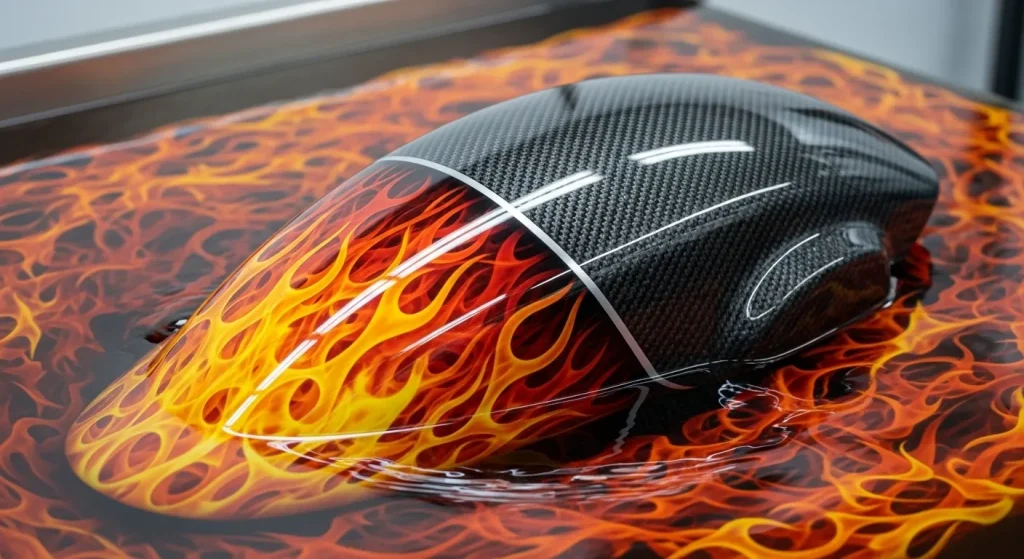
The Two-Tone Split Dip technique gives you a perfect solution to handle objects with complex curves or create contrasting designs on different sides. This advanced hydro dipping method creates a clean division between two distinct patterns on a single item and lets you control your design.
Two-Tone Split Dip overview
This technique solves the challenge of wrapping hydro film around curved surfaces. You don’t have to struggle with a single dip that might stretch or distort. Each side gets treated separately to achieve perfect pattern application. When paired with a reliable hydro dipping machine, this method ensures consistent results for motorcycle parts, gaming controllers, and other items where design precision matters.
You can create amazing combinations that aren’t possible with single dips. Picture vibrant flames on one side flowing into subtle carbon fiber on the other. The patterns meet at a clean seam that looks factory-made.
Materials needed for Two-Tone Split Dip
Here’s what you need to get started:
Steps to create Two-Tone Split Dip
The final result shows a perfect seam between the two dips that looks professional. You’ll save time compared to complex taping methods and get better results.
Hydro Dipping with Foil Film
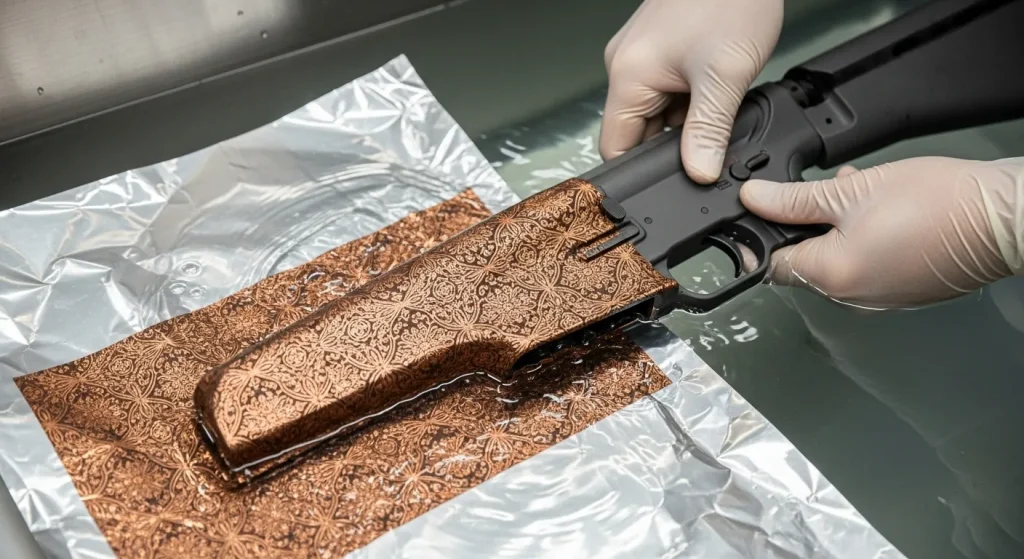
Foil film takes hydro dipping to the next level by offering precise pattern transfer with amazing detail. This premium technique really shines with its distinctive silver backing. It creates illusion patterns and complex designs that you just can’t achieve with simpler methods.
Hydro Dipping with Foil Film overview
The foil film dipping process is different from standard techniques because of its specialized construction and application. The film’s silver backing needs specific handling procedures to get the best results. This method really excels at creating complex patterns like copper illusion, carbon fiber, or wood grain that smoothly wrap around three-dimensional objects.
The “glassing out” effect makes this technique special. The film becomes smooth and transparent when properly activated, which will give a perfect pattern transfer. Unlike simple paint swirls, foil film consistently delivers repeatable patterns with professional-grade quality. This method works great for automotive parts, firearms, electronics, and other items that need precise detail.
Materials needed for Hydro Dipping with Foil Film
You’ll need these essentials to get successful results with foil film dipping:
Steps to create Hydro Dipping with Foil Film
Note that foil films need longer soak times than standard films because they’re thicker. Temperature plays a huge role in getting good results, so keep that water temperature steady throughout the process.
Masking Tape Pattern Dip
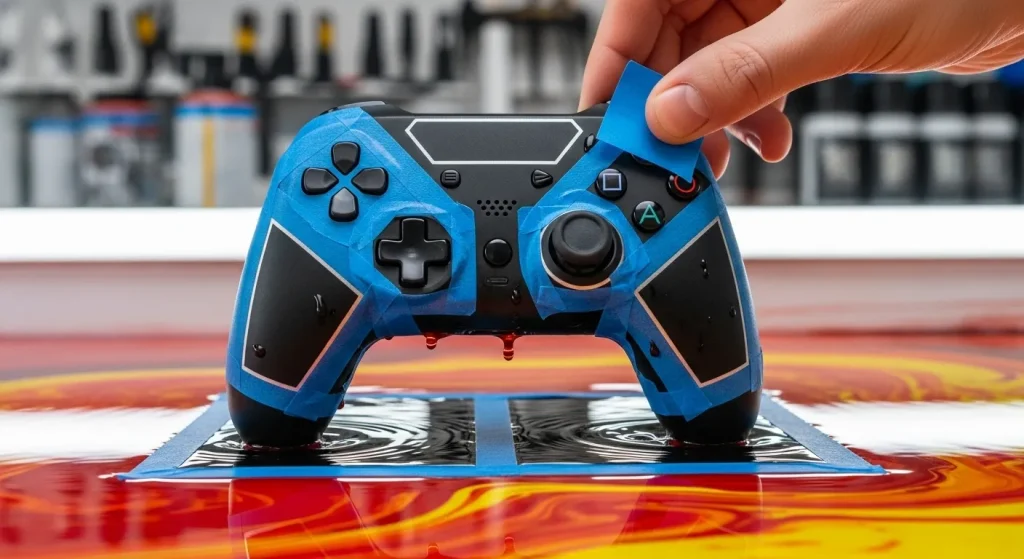
Tap into the full potential of precision and creativity with the Masking Tape Pattern Dip technique. This amazing approach combines artistic freedom with controlled design elements. It really stands out from other hydro dipping methods because you can place patterns strategically and create clean, sharp lines in your final design.
Masking Tape Pattern Dip overview
High-quality masking or painter’s tape creates boundaries between different colors or patterns in this technique. The method protects specific areas from paint and creates crisp lines after tape removal. My experience shows this works best for projects that need precise geometric shapes or when you want to keep certain sections looking natural.
This versatile technique works great with spray paint swirls and hydrographic film methods. The tape serves as a protective barrier and design element. You get complete control over how your finished product looks.
Materials needed for Masking Tape Pattern Dip
You’ll need these items to make this technique work:
Steps to create Masking Tape Pattern Dip
- Prepare your item – Clean it really well and remove accessories like shoelaces from shoes.
- Apply masking tape precisely on areas you want to protect. Press firmly with application tools like a cuticle pusher for complete adhesion, especially in tough spots.
- Make diagonal slits in tape corners and edges when using hydrographic film. This helps the film stretch properly without tearing during application.
- Protect interior areas by stuffing or taping them off to prevent air bubbles while dipping.
- Get your dipping container ready with the right water temperature. Apply spray paint or prepare hydrographic film using standard methods.
- Dip your item using traditional hydro dipping techniques. Make sure it’s completely submerged.
- Give it a good rinse and let it dry partially before removing tape.
- Take the tape off carefully – use a box cutter to free up corners where paint might have sealed over tape edges.
- Add clear protective coating after complete drying to ensure durability and shine.
Your finished piece will showcase clean, intentional lines between dipped and undipped areas. These striking contrasts aren’t possible with other hydro dipping methods. The technique shines especially when you’re creating custom designs with multiple color sections or want to preserve parts of the original surface.
Comparison Table
| Technique | Primary Materials Needed | Best Used For | Key Advantage | Special Considerations |
| Classic Spray Paint Swirl | Oil-based spray paint, large container, cool water | Plastic, metal, fabric, wood, glass, ceramic | Most available starting option, versatile | Needs ventilated space, 24-hour drying time |
| Marbled Nail Polish Dip | Nail polish, room-temp water, toothpicks | Small objects, ceramics, glassware | Easy on the wallet, creates delicate patterns | Polish sets fast, works on smaller items |
| Two-Tone Split Dip | Masking tape, two different films/paints, activator | Curved surfaces, motorcycle parts, controllers | Sharp division between patterns | Must dry fully between dips |
| Hydro Dipping with Foil Film | Hydrographic foil film, activator, warm water (80-90°F) | Automotive parts, firearms, electronics | Transfers patterns with precision, complex designs | Needs longer soak times, sensitive to temperature |
| Masking Tape Pattern Dip | High-quality masking tape, box cutter, application tools | Projects needing geometric shapes | Makes crisp lines and boundaries | Careful tape placement and removal needed |
Hydro dipping is one of the most available and impressive DIY techniques you can learn at home. Let’s take a closer look at ten different methods that can turn ordinary objects into amazing works of art. Each technique has its own advantages – from the beginner-friendly Classic Spray Paint Swirl to the professional-looking Foil Film method with remarkable detail.
The beauty of hydro dipping lies in its uniqueness. Without doubt, no two creations will ever look similar. Your projects become personal expressions instead of mass-produced items. Most techniques need minimal investment and use materials you probably have at home or can buy cheaply.